Page Tiles Print a large image on multiple pages
How to Print a Large Image on Multiple Pages
A home printer only prints one sheet at a time. To print a picture bigger than that, you split it into sheet-sized pieces, print each one, and join them. Here is how to do it properly on a Mac, plus the free routes on Mac and Windows.
What you need
- The picture. A JPEG, PNG, HEIC or TIFF, or a page of a PDF. The more pixels it has, the bigger it can print before it looks soft.
- A printer and ordinary paper. A4 or Letter is fine. A3 means fewer seams if your printer takes it.
- A way to split the picture. On a Mac that means an app, because the built-in print dialogs can only shrink a picture onto one page. The options are below.
- Scissors or a craft knife, a ruler, and glue stick or tape for putting it together.
Step 1: Decide the finished size
Start from where the print will go, not from the paper. Measure the wall, board or table and pick a width. Then check the picture can take it: divide its width in pixels by the finished width in inches.
| Picture width | Sharp (300 DPI) | Good (150 DPI) | Fair (100 DPI) |
|---|---|---|---|
| 2000 px | 17 cm / 6.7 in | 34 cm / 13 in | 51 cm / 20 in |
| 4000 px | 34 cm / 13 in | 68 cm / 27 in | 102 cm / 40 in |
| 6000 px | 51 cm / 20 in | 102 cm / 40 in | 152 cm / 60 in |
A phone photo is usually 4000 px or more across, so a poster about 70 cm wide is realistic. If your picture came from a website or a messaging app, it may be only 1000 to 2000 px. Enlarging a small image explains what you can and can’t get away with.
Step 2: Work out how many sheets
Each sheet can only print inside its margins. On A4 with 1 cm margins, that leaves 19 × 27.7 cm per sheet. Neighbouring sheets also share an overlap strip, so each extra sheet adds a little less than a full sheet.
Quick guide for a portrait poster on A4, 1 cm margins and 1 cm overlap:
| Sheets | Printable area | Good for |
|---|---|---|
| 2 × 2 (4 sheets) | 37 × 54.4 cm | A2-ish poster, a small map |
| 3 × 3 (9 sheets) | 55 × 81.1 cm | A1-ish poster, a sewing pattern piece |
| 4 × 4 (16 sheets) | 73 × 107.8 cm | Door-sized print, a floor plan |
The picture keeps its own shape inside that area, so one side usually ends up a little shorter. The poster size calculator works out the exact numbers for your picture and paper.
Step 3: Split and print it on a Mac with Page Tiles
This is the job Page Tiles was built for.
- Open the picture. Drag it onto the Page Tiles window, choose File › Open, or copy it and press ⌘ V. For a PDF, use the arrows to pick the page.
- Set the size. Under Finished size, choose By sheets and type how many sheets wide and tall, or choose By size and type the width or height in mm, cm or inches. The other side follows the picture, so it never stretches.
- Choose the paper. Pick A4, A3, Letter or Legal. Leave orientation on Auto: it chooses portrait or landscape, whichever needs fewer sheets and wastes less paper.
- Set overlap and marks. Pick an overlap (10 mm is the default) and turn on the printed marks you want: cut marks, alignment marks and sheet labels.
- Check the sheets. Switch from Assembled to Sheets to see each page exactly as it will print. Look at the quality badge too: Good or Sharp means you’re fine.
- Print. Click Print 9 Sheets… (the number matches your grid). The standard macOS print panel opens. Keep the scale at 100%.
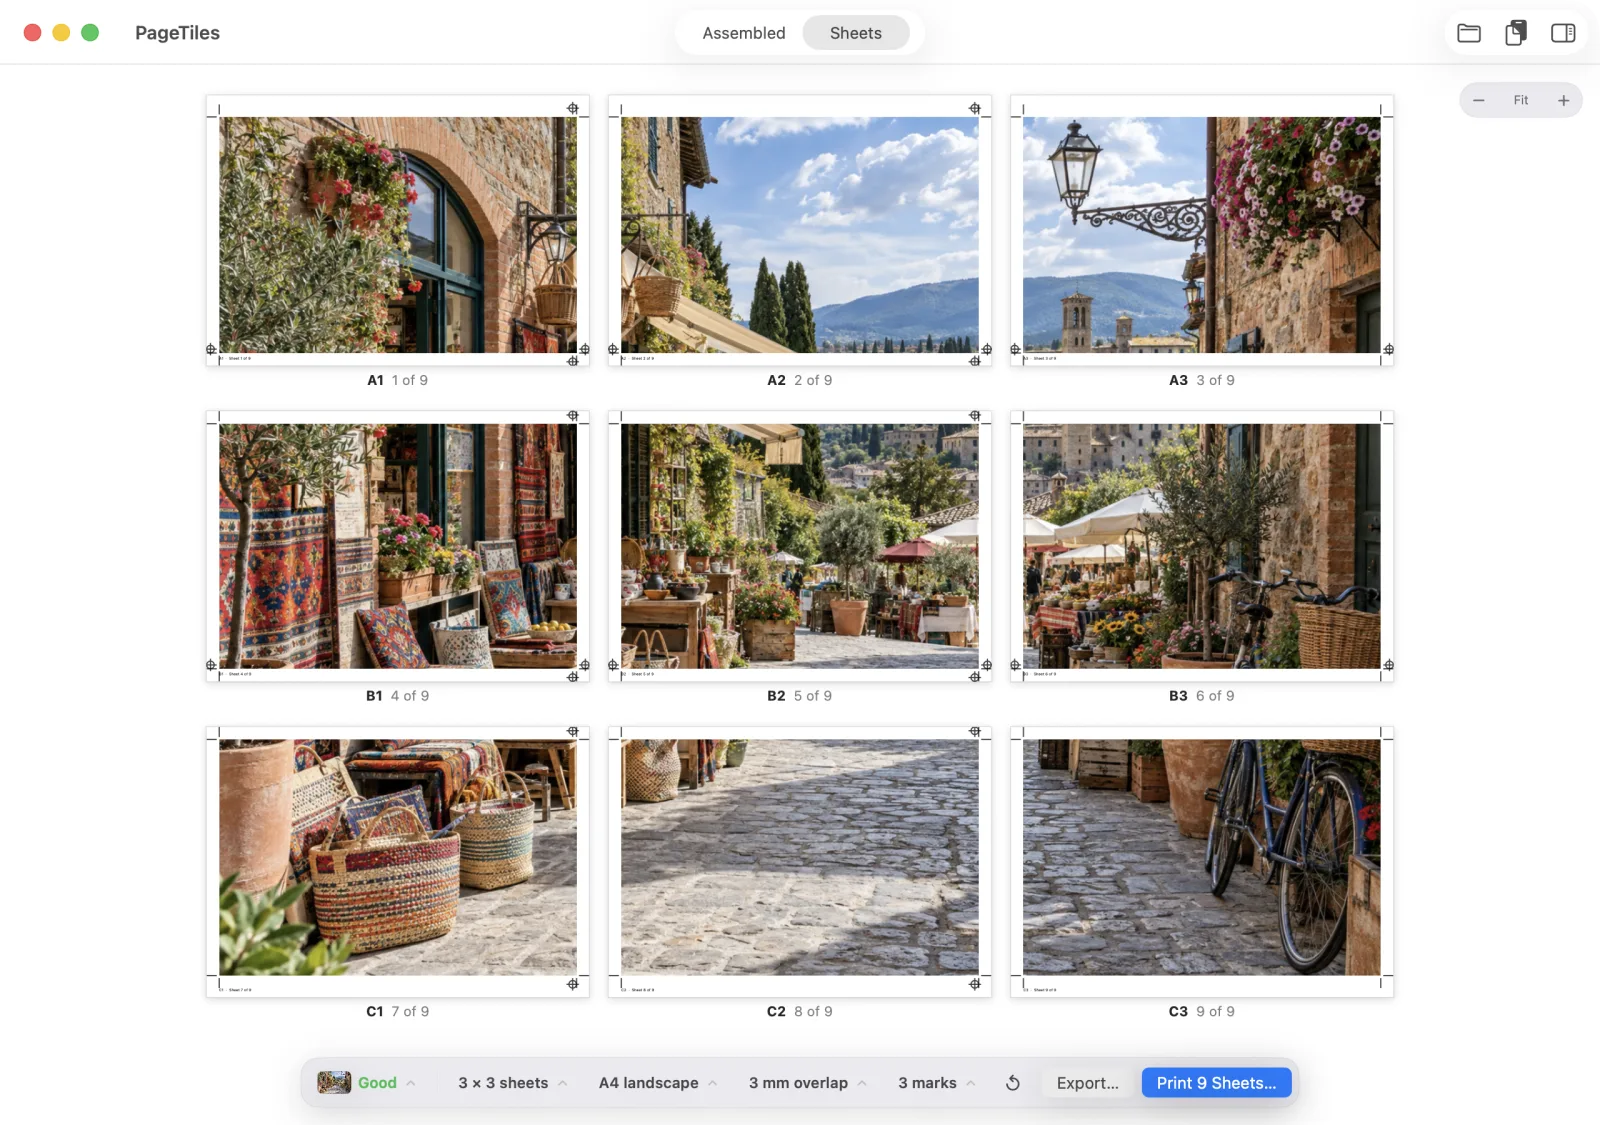
Not sure your printer reaches the edges you set? Use Print Test Seam… first. It prints only A1 and A2, so you can hold them together and check the overlap before printing the rest. You can also Export PDF… and print later, or send the PDF to someone else.
Get Page Tiles on the Mac App Store $2.99 one-time · macOS 12+
Other ways on a Mac
Adobe Acrobat Reader (free). Acrobat’s print dialog has a Poster option under Page Sizing & Handling, with tile scale, overlap, cut marks and labels. It only prints PDFs, so first turn the picture into one: open it in Preview and choose File › Export as PDF. You set the size as a percentage rather than in centimetres, and there’s no picture-quality check.
Preview and Photos. Neither can split a picture across pages. Their print dialogs scale the picture to fit one sheet. You could crop the picture into pieces by hand and print each crop at a matching scale, but getting the pieces to line up is slow and error-prone.
Websites. Several free sites turn an uploaded picture into a tiled PDF. They work, but your picture goes to someone else’s server, and you print their PDF with whatever margins they chose. Check how close your printer prints to the edge first.
On Windows
Paint. Open the picture, go to File › Print › Page setup, and under Scaling choose Fit to with the number of pages across and down. Paint doesn’t add overlap or marks, so leave a margin and trim carefully.
Your printer’s driver. Many HP, Canon, Epson and Brother drivers have a Poster or Tiling layout in Printing Preferences, often with 2 × 2, 3 × 3 and 4 × 4 options. Where it lives varies by model and some drivers don’t have it.
Microsoft Word has no way to split one picture across pages. It prints what fits on a page and cuts the rest off. Use Paint or the driver instead.
Step 4: Put it together
Lay the sheets out in label order: row A across the top, then B, then C. Trim along the cut marks on the edges that overlap a neighbour, line up the alignment marks, and glue or tape from the back. How to assemble a tiled poster has the details, including which edges to cut. On a Mac, not from Preview or Photos: their print dialogs shrink the picture to fit one sheet. The free route is Adobe Acrobat Reader’s Poster option, after saving the picture as a PDF. On Windows, Paint’s Page Setup can fit a picture to several pages, and some printer drivers have a Poster layout. The print dialog scaled it down. Most dialogs default to “Scale to fit” or “Fit to printable area”. Set the scale to 100% or Actual Size. Printing at actual size on a Mac shows where the setting lives. Use overlap. Each page repeats a strip of its neighbour’s edge, so you trim one page and lay it over the next instead of butting two paper edges together. 5 to 10 mm is plenty.Questions
Can I print a large image on multiple pages without an app?
Why is my printed poster smaller than I set?
How do I stop gaps between the pages?